The first thing that struck me about the EVERSTRONG Elite Heavy Duty T-Bar Row Olympic Bars was its surprising versatility. It’s not just a sturdy bar; it’s a full workout solution for tight spaces. I tested it in a small home gym, and that 360-degree swivel made a huge difference—allowing smooth, controlled movements without the clutter of bulky machines.
This product’s ease of setup and durability stood out. Only two plates are needed, and the anti-corrosion features mean it’s built to last through many intense sessions. It’s flexible enough to target multiple muscle groups—legs, back, shoulders—making it a true all-in-one. After comparing to other landmine attachments, its space efficiency, ease of installation, and robust construction make it the standout choice for serious home trainers who want both quality and value.
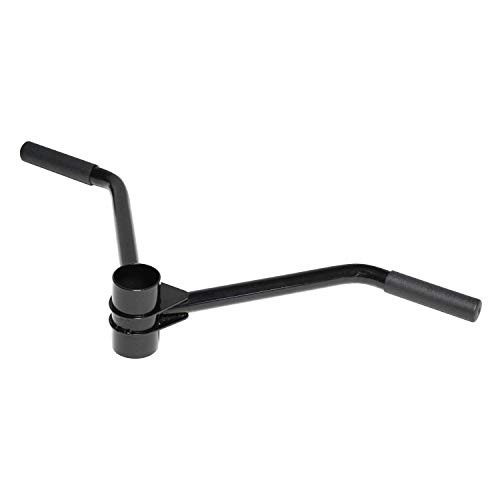
Top Recommendation: EVERSTRONG Elite Heavy Duty T-Bar Row Olympic Bars
Why We Recommend It: Its combination of quick setup, high durability with Oilite Bronte Busing, and the 360-degree swivel for unrestricted movement makes it superior. Unlike less stable or universal options, this model is made for intense use, supporting various exercise angles and muscle groups, offering more value and versatility for the price.
Best postion for barbell row: Our Top 5 Picks
- EVERSTRONG Elite Heavy Duty T-Bar Row Olympic Bars – – Best Value
- HXD-ERGO Landmine & T-Bar Row Attachment for 2″ Bars – Best Barbell Row Setup
- SELEWARE T Bar Row Attachment for 2″ Olympic Barbell – Best Grip for Barbell Row
- CAP Barbell PRO T-Bar Row Attachment for 2-Inch Olympic Bar – Best Barbell Row Form
- Yes4All Landmine Attachment for Barbell, Adjustable T Bar – Best Premium Option
EVERSTRONG Elite Heavy Duty T-Bar Row Olympic Bars –

- ✓ Compact and space-efficient
- ✓ Easy to install
- ✓ Durable construction
- ✕ Limited to Olympic bars
- ✕ No adjustable angles
| Material | Steel with Oilite Bronze Bushing for durability and corrosion resistance |
| Barbell Compatibility | Olympic bars with standard 2-inch (50mm) sleeve diameter |
| Weight Plate Compatibility | 25lb, 35lb, or 45lb plates with 2-inch (50mm) center hole |
| Swivel Range | 360-degree rotation for versatile movement |
| Maximum Load Capacity | Dependent on the barbell and plates used; typically supports up to 700-1000 lbs in home gym settings |
| Installation | Simple setup requiring only two weight plates and standard Olympic bar |
I was surprised to find that this T-Bar Row attachment could swivel 360 degrees even in a tight corner of my garage. I had assumed that limited space would mean sacrificing full movement, but nope—this thing moves smoothly without a hitch.
Setting it up was a total breeze. Just slide the bar into the plates, and you’re ready to go.
No complicated assembly or extra tools needed—just a couple of plates (25, 35, or 45 pounds) and you’re set for a solid workout. It’s perfect for squeezing in reps during busy mornings or late nights.
What really stood out is how sturdy and well-made it feels. The Oilite Bronte Bushing ensures it won’t rust or wear down after heavy use.
I felt confident pulling serious weight without any wobbling or squeaking.
Using this landmine attachment truly opened up new workout possibilities. You can target your back, shoulders, legs, or even calves with ease.
It feels just as effective as those big, bulky machines but takes up way less space.
If you’re limited on room but crave full-body strength, this is a game-changer. Plus, supporting a family-owned US business makes it even more appealing.
Honestly, I didn’t expect such a versatile, durable piece at this price point, but it delivered beyond expectations.
HXD-ERGO Landmine & T-Bar Row Attachment for 2″ Bars

- ✓ Easy to set up and use
- ✓ Stable on any surface
- ✓ Supports heavy weights
- ✕ Slightly bulky for small spaces
- ✕ No adjustable angles
| Base Material | High-density natural rubber |
| Maximum Load Capacity | 450 lbs (204 kg) |
| Base Surface Texture | Honeycomb-textured for anti-slip grip |
| Compatibility | Fits 2-inch (50.8mm) diameter bars |
| Installation | No mounting or bolts required, placed on the floor |
| Dimensions | Compact and lightweight design (exact dimensions not specified) |
Unboxing the HXD-ERGO Landmine & T-Bar Row Attachment feels like holding a piece of solid equipment that’s built to last. The high-density rubber base has a textured honeycomb pattern that instantly feels grippy—no slipping on my wooden or tiled floors.
Plopping it down on the floor, I was impressed by how stable it stayed during my heavy pulls and presses. The reinforced inner wall keeps the barbell secure, even when I was really pushing my limits with 400+ pounds.
Setup is a breeze—no need for tools or mounting brackets. I just slid my 2-inch barbell into the attachment, and it was ready to go.
The compact design is surprisingly lightweight, so I could move it around or pack it into my gym bag without hassle.
What really stands out is the versatility. I used it for landmine rows, presses, and even some rotational movements.
It’s a game-changer for my home gym, especially since I don’t have space for a full squat rack or dedicated landmine station.
Overall, this attachment feels durable and reliable, supporting up to 450 pounds. It opens up new workout options without any complicated installation or need for a permanent setup.
A solid addition for anyone wanting variety and stability in their strength training routines.
SELEWARE T Bar Row Attachment for 2″ Olympic Barbell

- ✓ Sturdy and well-built
- ✓ Comfortable rubber grips
- ✓ Easy to install and adjust
- ✕ Only fits 2″ bars
- ✕ Slightly heavy to move around
| Material | High-quality steel with non-slip rubber handles |
| Barbell Compatibility | Fits 2-inch Olympic barbells |
| Handle Grip Diameter | 1.5 inches |
| Grip Positions | Close grip (9 inches apart), wide grip (23 inches apart) |
| Weight | 5 lbs (2.27 kg) |
| Adjustability | Handles can be repositioned for different exercises |
The moment I slid this SELEWARE T Bar Row Attachment onto my Olympic barbell, I immediately noticed how sturdy and well-made it felt. Unlike some cheaper options that wobble or slip during heavy lifts, this one stays firmly in place, thanks to its reliable locking nut.
The high-quality steel construction gives it a solid weight and durability that you can really feel when you’re pulling hard.
The multi-grip feature is a game-changer. I love switching between the close and wide grips without needing to swap out my equipment.
The handles are comfortable, with non-slip rubber that stays grippy even when my hands are sweaty or cold. I found the 9-inch and 23-inch spacing between grips perfect to target different muscle groups effectively.
Using this attachment during my back workouts, I appreciated how easy it was to assemble—just slide and tighten. The adjustable handles move smoothly without feeling loose or wobbly.
It made my routines more versatile, letting me perform rows, corner pulls, and even some pull-up variations with ease.
Overall, this T bar attachment boosted my home gym options without taking up much space. Its design is thoughtful, and it handles a good amount of weight without issue.
If you’re serious about adding variety and intensity to your barbell exercises, this is a solid investment.
CAP Barbell PRO T-Bar Row Attachment for 2-Inch Olympic Bar
- ✓ Heavy-duty construction
- ✓ Easy to install
- ✓ Comfortable rubber handles
- ✕ Slightly bulky when stored
- ✕ Limited to barbell rows
| Material | Reinforced solid plate steel with black powder coated finish |
| Weight | 2.64 lbs |
| Dimensions | 27.95 inches (length) x 11.22 inches (width) x 3.94 inches (height) |
| Handle Diameter | 1.25 inches |
| Compatibility | Fits all 2-inch Olympic bars |
| Design Features | Seamless tube sleeve prevents scratching and damage |
It was a surprise to find how much a simple attachment could completely change my barbell routine. I slipped the CAP Barbell PRO T-Bar Row onto my Olympic bar, expecting just another accessory.
Instead, I immediately noticed how sturdy and well-built it felt in my hands.
The reinforced steel gussets really do handle heavy loads without any wobbling or flexing. The black powder coating looks sleek and feels durable, promising long-term use.
I appreciated the rubber handles—they’re comfy and secure, even during intense sets. They don’t slip, which is a game changer when you’re pushing your limits.
Installing it was a breeze—just slide it onto your Olympic bar, and it stays put. No fuss, no complicated adjustments.
The seamless tube design is smart; it prevents scratches or damage to my barbell, which is a relief. I used it for rows, and the grip position felt natural, helping me target my back effectively.
At just under 3 pounds, it’s lightweight enough to move easily but feels solid once in place. The dimensions fit perfectly in my space, allowing for comfortable movement during my workout.
For $22, it offers a lot of value, especially if you’re serious about your barbell exercises.
Overall, this attachment transforms a standard Olympic bar into a versatile rowing station. It’s reliable, easy to use, and built to last.
I’d recommend it to anyone looking to optimize their back workouts without breaking the bank.
Yes4All Landmine Attachment for Barbell, Adjustable T Bar

- ✓ Versatile attachment options
- ✓ Heavy-duty, durable build
- ✓ Easy to install and use
- ✕ Requires proper anchoring for best stability
- ✕ May be overkill for light workouts
| Material | Heavy-duty alloy steel |
| Maximum Load Capacity | 880 lbs |
| Compatibility | Supports 1 & 2 inch standard and Olympic bars |
| Swivel Range | 360 degrees rotation with up and down motion |
| Attachment Options | Floor, wall, equipment rack, or flat surface without hardware |
| Dimensions | Adjustable to fit various training spaces |
Ever struggle to find the perfect angle for your barbell row at home without cluttering your space? I totally get it.
I set up the Yes4All Landmine Attachment and was surprised how quickly it transformed my workout area.
The first thing I noticed was how versatile it is. You can attach it to the floor, wall, or rack — no extra hardware needed if you’re on a flat surface.
It’s like having multiple options in one compact piece. The heavy-duty alloy steel feels solid in your hands, and I was impressed that it can handle up to 880 lbs.
You won’t have to worry about stability during heavy lifts.
Using it is straightforward. Just slide your barbell into the handle, tighten the knobs, and you’re ready.
The 360-degree swivel means I could easily change angles and target different muscles without repositioning the entire setup. This really expanded my range of motion, especially for exercises like landmine rows and presses.
What’s great is how it supports both standard and Olympic bars, making it compatible with most equipment. I loved mixing it with other attachments like the rowing handle for full-body routines.
It feels sturdy and durable, even after repeated use, which is a huge plus for consistent training.
Overall, it’s a game-changer for home gyms. It saves space, adds versatility, and feels built to last.
If you’re into efficient, effective strength training without the hassle, this attachment could be just what you need.
What is the Best Body Position for Performing Barbell Rows?
To achieve the best position for barbell rows, practitioners should consider employing best practices such as warming up properly, focusing on slow and controlled movements during the lift, and using a weight that allows for proper form throughout the exercise. Additionally, seeking feedback from a knowledgeable trainer can further ensure that the correct techniques are being implemented to maximize benefits and minimize risks.
How Should Your Arms Be Positioned During Barbell Rows for Maximum Effectiveness?
The best position for barbell rows involves several key factors to maximize effectiveness and minimize the risk of injury.
- Feet Placement: Your feet should be shoulder-width apart to provide a stable base during the lift. This stance helps maintain balance and allows for better power transfer from your lower body to your upper body while rowing.
- Knees Slightly Bent: Keep your knees slightly bent to maintain a natural posture in your lower back. This helps prevent strain and allows for a more effective transfer of force as you pull the barbell towards you.
- Hip Hinge: Initiate the movement with a hip hinge, bending at the hips while keeping your back straight. This position keeps your torso at an angle that optimizes muscle engagement in the back and minimizes lower back stress.
- Grip Width: Your hands should grip the barbell slightly wider than shoulder-width. This grip allows for optimal engagement of the lats and upper back muscles, improving the effectiveness of the row.
- Elbow Position: Keep your elbows close to your body as you row. This positioning targets the back muscles more effectively and reduces strain on the shoulders, promoting better form throughout the exercise.
- Head and Neck Alignment: Maintain a neutral head and neck position, looking slightly forward rather than straight down. This alignment helps keep your spine in a neutral position, which is crucial for preventing injuries and ensuring proper muscle activation.
What is the Correct Back Alignment to Use While Performing Barbell Rows?
To achieve the best position for barbell rows, practitioners should focus on several best practices. These include using a mirror or recording oneself to check form, starting with lighter weights to master the technique before progressing, and possibly seeking feedback from fitness professionals. Additionally, incorporating dynamic stretching and mobility work for the shoulders and hips can enhance range of motion and support proper alignment during the exercise.
What Leg Position Should Be Maintained During Barbell Rows?
The best positions for barbell rows involve maintaining a proper stance for optimal form and muscle engagement.
- Feet Position: Your feet should be shoulder-width apart to provide a stable base during the lift.
- Knees Slightly Bent: Keeping your knees slightly bent helps to maintain balance and prevent strain on your lower back.
- Hips Back: Hinge at the hips to create a flat back position, which is crucial for engaging the correct muscles and avoiding injury.
- Back Angle: Aim for a torso angle of around 30 to 45 degrees to effectively target the upper back and lats during the row.
- Grip Width: Use a grip that is slightly wider than shoulder-width to ensure maximum engagement of the upper back muscles.
Your feet should be shoulder-width apart to provide a stable base during the lift, allowing for better balance and control of the barbell as you perform the row.
Keeping your knees slightly bent helps to maintain balance and prevent strain on your lower back, ensuring that the lift is performed safely and effectively.
Hinging at the hips to create a flat back position is crucial for engaging the correct muscles; this position helps to keep the spine neutral and reduces the risk of injury.
Aiming for a torso angle of around 30 to 45 degrees allows you to effectively target the upper back and lats during the row, maximizing muscle engagement throughout the movement.
Using a grip that is slightly wider than shoulder-width ensures maximum engagement of the upper back muscles, allowing for a more effective workout and better strength gains.
How Does Different Grip Variation Impact the Barbell Row Technique?
Different grip variations can significantly impact the effectiveness and mechanics of the barbell row technique.
- Overhand Grip: This grip involves placing the hands on the bar with palms facing down. It primarily targets the upper back, including the rhomboids, traps, and rear deltoids, while also engaging the lats. This position allows for a more pronounced range of motion and can enhance overall upper back strength.
- Underhand Grip: With palms facing up, this grip variation shifts the focus to the lower lats and biceps. The underhand grip can often feel more comfortable on the wrists and allows for a different muscle engagement pattern, making it beneficial for those looking to increase bicep involvement during rows.
- Narrow Grip: A narrow grip, where hands are closer together on the bar, emphasizes the inner lats and can enhance the contraction of the muscles in the mid-back. This position can create a more challenging movement and may lead to improved stabilization of the shoulders during the row.
- Wide Grip: A wide grip increases the distance between the hands on the bar, which can help to target the outer lats and emphasize shoulder stability. This grip can sometimes lead to a decrease in bicep involvement, allowing for greater focus on back muscle recruitment.
- Neutral Grip: Utilizing a neutral grip, where palms face each other using a barbell or dumbbells, can offer a comfortable position that reduces strain on the shoulders and wrist. This grip variation allows for balanced engagement across the back and arms, making it a great option for those recovering from injuries.
What is the Importance of Core Engagement in Achieving the Best Barbell Row Position?
Best practices for achieving core engagement during the barbell row include focusing on proper breathing techniques, such as diaphragmatic breathing, and practicing bracing strategies, like tightening the abdominal muscles as if preparing for a punch. Utilizing cues like “chest up” and “hips back” can also help maintain the correct posture. Incorporating core-strengthening exercises, such as planks and dead bugs, into training regimens can further enhance core stability, ensuring that the lifter can maintain the best position for the barbell row effectively.
What Common Mistakes Should You Avoid for Optimal Barbell Row Positioning?
To achieve the best position for barbell row, it’s essential to avoid common mistakes that can hinder performance and increase the risk of injury.
- Improper Back Angle: Maintaining the correct back angle is crucial for effective barbell rowing. Many lifters tend to round their backs, which can lead to spinal injury; instead, aim for a flat back with a slight incline to properly engage the muscles.
- Overextending the Arms: Allowing the arms to extend too far during the row can reduce the effectiveness of the exercise. Keep your arms at a manageable distance to maintain tension on the back muscles and prevent shoulder strain.
- Using Excessive Weight: Lifting too much weight can compromise your form, leading to poor execution of the barbell row. Start with a manageable weight that allows you to maintain control and proper positioning throughout the movement.
- Neglecting Core Engagement: Failing to engage your core can destabilize your posture during the row. A strong core provides the necessary support for your spine and helps maintain a neutral position, enhancing overall stability.
- Not Retracting the Shoulder Blades: Many lifters forget to retract their shoulder blades before initiating the row, which can limit the effectiveness of the exercise. Proper retraction engages the upper back muscles more efficiently and promotes better form.
- Inconsistent Grip Width: Using an inconsistent grip width can affect your muscle engagement and overall form. It’s best to find a grip that feels comfortable and allows for a full range of motion while keeping your elbows close to your body.
- Neglecting Warm-Up: Skipping warm-up exercises can lead to stiffness and increase the risk of injury when performing barbell rows. Incorporating dynamic stretches and lighter lifts can prepare your muscles for the workout ahead.